
Microsoft Office 365 is a phenomenon cloud platform that provides different services to manage business works on the cloud so that users can quickly complete their tasks from anywhere and anytime. The shared point is also a part of all the same services of Office 365. A shared mailbox is a mailbox in which multiple users can read and send email messages. Sometimes admin wrongly converted the regular mailbox to shared mailbox. In this situation, users are required to convert Office 365 Shared Mailbox to Regular User Mailbox.
If you are also looking for the easiest process to move Shared Mailbox to Regular Mailbox in Office 365, this article is only for you. Here I will share the quick and safe process so that you can easily transfer Office 365 shared mailbox to regular user mailbox.
Difference Between Shared Mailbox and Regular User Mailbox
User Mailbox: A user mailbox is a single mailbox that is created by Office 365 admin for a user to send and receive email messages and schedule meetings and appointments.
Shared Mailbox: A shared mailbox is a mailbox that can used by multiple persons for sending and receiving emails from the same address. Any member of the shared mailbox can respond of emails that are sent to the shared address. It can be created without a license with 50 Gb storage.
How to Convert Office 365 Shared Mailbox to Regular User Mailbox?
Microsoft Office 365 provides two different methods by using that we can move shared mailbox to regular user mailbox. First is using Admin Center and second d is using PowerShell commands. Les see both process one by one.
Move Office 365 Shared Mailbox to Regular user mailbox using Admin Center:
1: Open a Microsoft Office 365 as an Admin account and Go to the Exchange admin center.
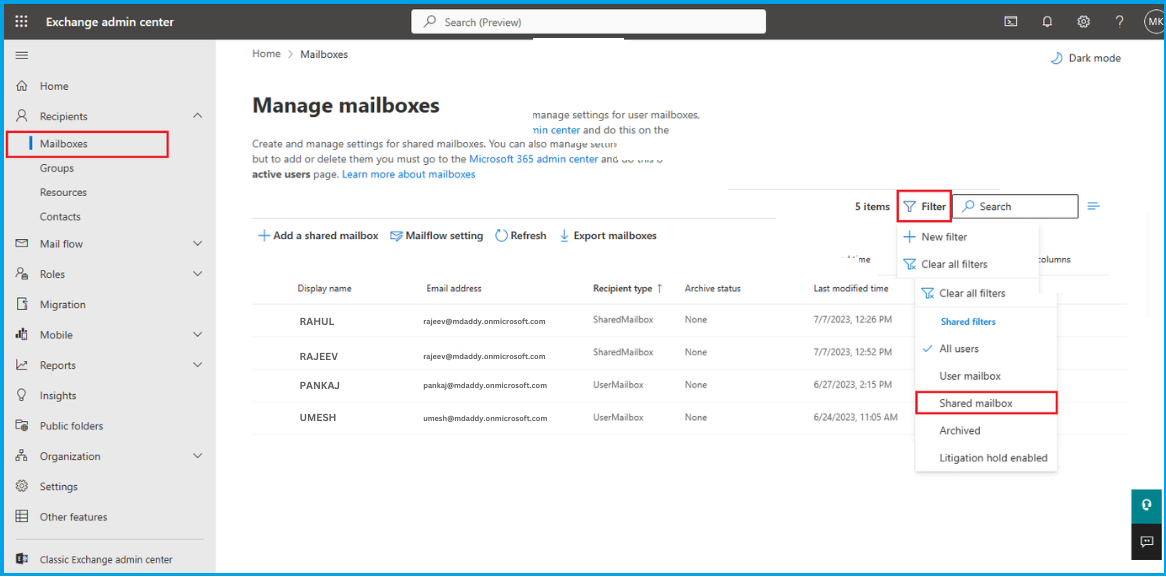
2: Now select the Recipients and then choose Mailbox in the left sidebar. Here All user mailboxes will be shown on the screen.
3: Go to the filter option and select Shared Mailbox. Now you can see only shared mailboxes.
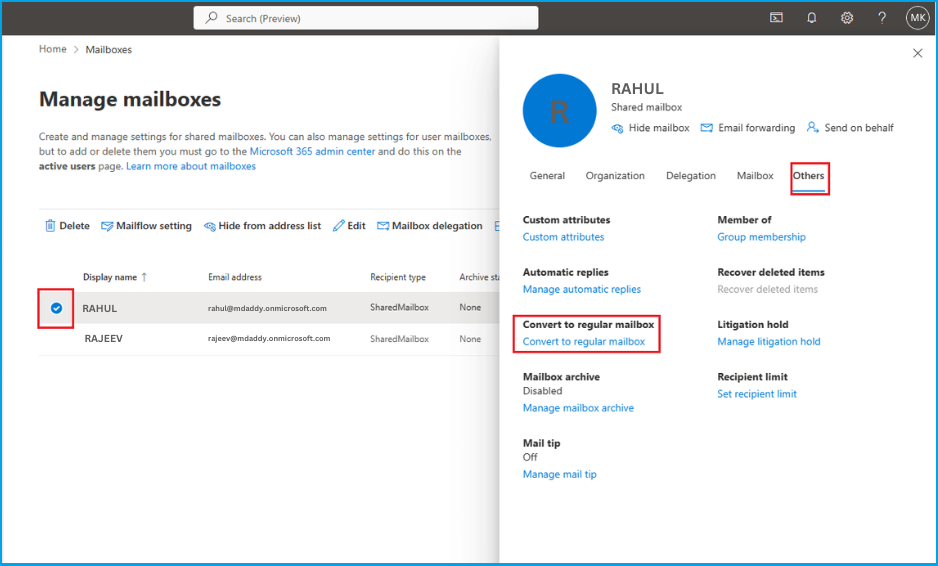
4: Now select the mailbox that you want to convert shared mailbox into regular user mailbox. Here a window will open on the right side, choose the Others and click on the Convert to regular mailbox.
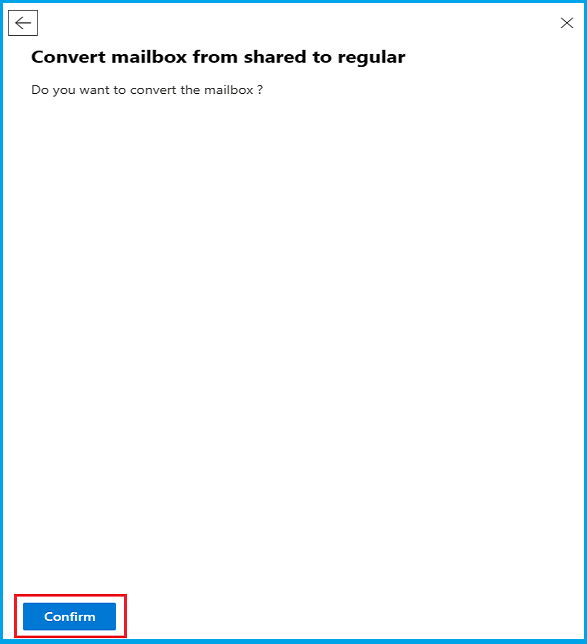
5: A confirmation window will be open here just press the Confirm button.
6: When the process is done, assign the license and reset the password to access the mailbox.
Convert Shared Mailbox to User Mailbox Using PowerShell Commands
Follow the below steps to perform the conversion from Shared to regular mailbox.
1: Run Windows PowerShell as an administrator and connect to Exchange Online.
2: When the admin account connects to Exchange Online put the below command and run it.
Set-Mailbox –Identity “[email protected]” -Type Regular
Note: Use a shared mailbox address in place of [email protected].
3: Run the below command to check if the mailbox is converted successfully or not.
Get-Mailbox -Identity “[email protected]” | Select Name, RecipientTypeDetails
4: If it is done, provide an appropriate license and reset password to access the user mailbox.
Closing Word: So, these are two different processes by using that we can convert shared mailbox in regular user mailbox. You can use any process as per your comfort and transfer shared mailbox into regular user mailbox. Hope this article helpful for you to convert your mailbox.
Also Read: Setup Email Account in Outlook for Android and iOS Mobile