This tutorial will help you understand how to enable archive mailbox in office 365 using EAC or powershell and also describes creating or disabling an archive mailbox in Exchange Online.
Microsoft Office 365 allows archiving mailboxes in order to provide users with additional mailbox storage space. This option is also called In-Place Archiving. An archive mailbox also provide an alternate storage location to users to store old messaging data. Before discussing how to enable or disable an archive mailbox in Office 365, it is compulsory to know that Exchange Online Plan 1 (Business and E1) are limited to 50 GB of storage and Exchange Online Plan 2 (E3) are unlimited and does not have any storage limits.
By default In-Place Archive feature is disabled for all mailboxes. But when a user enable their archive mailbox that time he/she can easily store messages in their archive mailbox. User can access their archive mailboxes by using Outlook Web App and Outlook. Using any of these mail applications, users can quickly view messages in their archive mailbox. Apart from that users can also move or copy messages between their primary mailbox and their archive mailbox.
How to Enable Archive Mailboxes using Exchange Admin Center (EAC)?
- Sign in to your Office 365 account and Click the app launcher icon
 then Click Admin
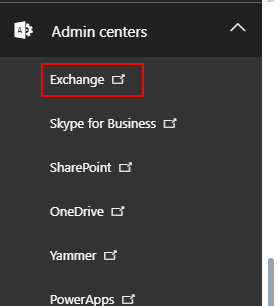
 - Click Admin centers from the lower-left navigation of the Office 365 admin center, and then click on Exchange option.
- In the EAC, go to Recipients > Mailboxes. Select a required mailbox do you want to archive and click enable option In the details pane, under In-Place Archive.
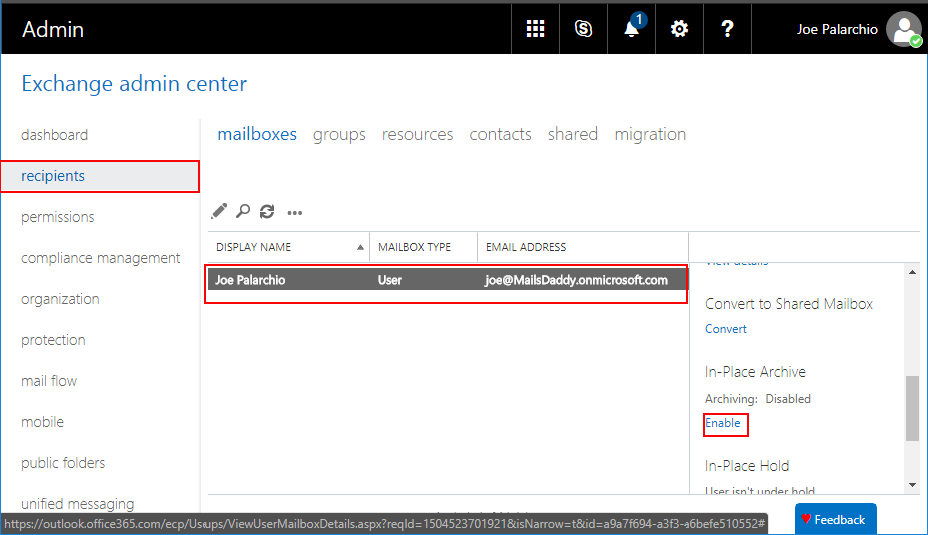
Note: You can also perform bulk archives selecting multiple mailboxes. You can use the shift and Ctr keys in order to select multiple mailboxes. After that click on More options in the details pane. Then, click Enable under Archive.
How to Enable Archive Mailbox in Office 365 using Powershell?
In the very first step, you need to connect your Exchange Online using Windows PowerShell. See how?
Now run following command.
Enable-Mailbox -Identity "Joe Palarchio" –Archive
This example enables the archive for Joe Palarchio’s mailbox. But if you want to enables an archive for all user mailboxes in your organization then run the following command.
Get-Mailbox -Filter {ArchiveStatus -Eq "None" -AND RecipientTypeDetails -eq "UserMailbox"} | Enable-Mailbox –Archive
How to Disable Archive Mailboxes using Exchange Admin Center (EAC)?
- Sign in to your Office 365 account and the click Admin.
- In the lower-left navigation of the Office 365 admin center, click Admin centers, and then click Exchange.
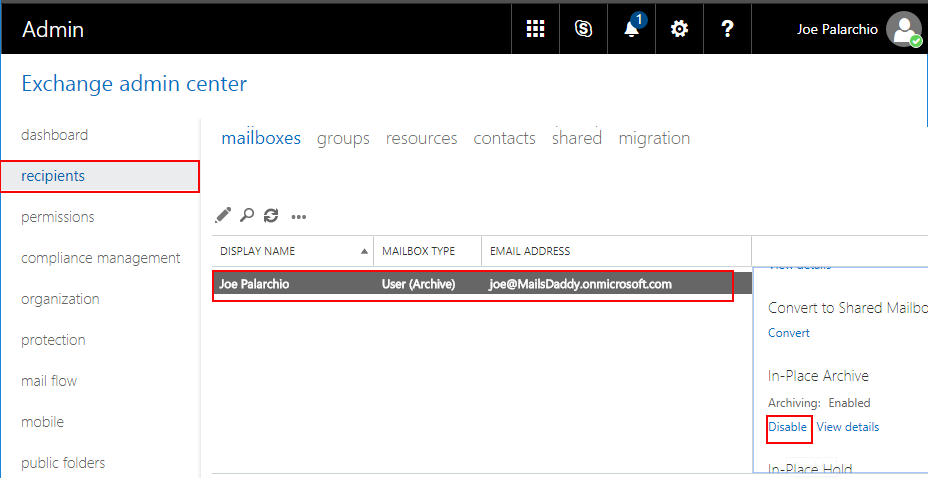
- In the Exchange Admin center (EAC), go to Recipients > Mailboxes and select a mailbox do you want to disable. Click on Disable under In-Place Archive, in the details pane.
How to Disable Archive Mailboxes using Windows PowerShell Commands?
Run the following command once you connect your Office 365 organization with Windows PowerShell.
Disable-Mailbox -Identity "Joe Palarchio" -Archive
Conclusion:
We hope that this article will surely help you in enabling or disabling archive mailbox in Exchange Online (Office 365). We have discussed two methods for doing the same. One is by using Exchange Admin Center (EAC) and another is Windows PowerShell Commands. You can prefer required one as per your need and requirement. Apart from that, if you have some PST files which you want to import into Office 365 mailbox then you can give a try to MailsDaddy PST to Office 365 migration tool which is available free of cost to try.