Convert Offline OST File into PST Format Using OST to PST Converter Tool
- Safe & secure solution to recover corrupted OST files.
- Convert OST to PST without losing a bit of information.
- Preserve folder hierarchy and email properties intact.
As per current market research, no one can ignore this, Outlook is the most preferable email client to manage email databases. Moreover, Outlook provides an easy work user interface so that users can work perfectly on it. Due to some internal errors or other reasons, sometimes Outlook & Exchange Server OST file gets corrupted. In this situation, users are required to convert OST to PST file format.
If you are planning to export OST files into PST format free of cost, this article is only for you. Here I will share all the procedures by using the users can easily migrate OST to PST format.
How to Convert OST File into Outlook PST Format?
1: Export OST to PST Using PowerShell Command / Script:
Follow all the below-listed commands to easily convert OST to PST. Don’t forget to follow a single command.
A: Export OST to CSV Format:
1: Click on the Start button and run Windows PowerShell as an administrator.

2: The PowerShell usually restricts running script, so now run the following command to change the policy:
Set-ExecutionPolicy -ExecutionPolicy Unrestricted

3: When the message comes to confirm, Type Y and press Enter button.

4: Now run the cd command to confirm the location of the offline OST file. My OST file is on the desktop, so I am running the below command. So, when you run your CD command exactly provide your OST file location.
Cd C:\Users\HP\Desktop

5: After that follow the below command to start the convert OST file conversion task. Here provides the path of the OST file and CSV file location with the file name and extension.
New-Object -ComObject Outlook.Application | %{
$_.Session.AddStoreFromFile(“C:\Users\HP\Desktop\test-5.ost”)
$_.Session.GetDefaultFolder(6).Items |
Select-Object -Property Subject, ReceivedTime, SenderEmailAddress, RecipientEmailAddress, Body |
Export-Csv -Path “C:\Users\HP\Desktop\YourPSTFile.csv” -NoTypeInformation
}

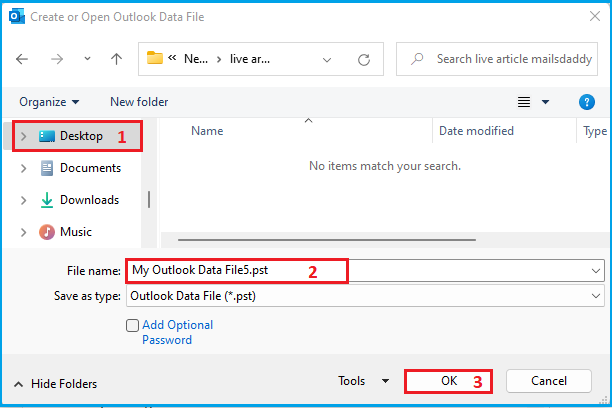
B: Create New PST File Mailbox in Outlook:
1: Open Microsoft Outlook and Choose New Items.
2: Select More Items >> Provide Outlook data Items…

3: Provide the file name and the destination location where you want to create a new PST file.

C: Convert CSV to PST Format:
1: Open Microsoft Outlook >> Click on File.
2: Choose Open & Export and click on Import/Export option.

3: Select Import from another program or file and press the Next button.

4: Choose Comma Separated Value and go to Next.

5: Click on Browse to provide the location of the converted CSV file. Also, choose Allow duplicates to be created and press the Next button.

6: Choose the mailbox where you want to import the email databases and go to Next.

7: Enable the check box and click on the Finish button.

8: Now all data will be imported in a new PST file and you will get a new PST file.

Limitations of Manual Process:
1: This process is not helpful for a heavy OST file.
2: It only enables users to convert emails without attachments.
3: Not maintains folder structure, text formatting, and email properties.
4: It does not export contacts, calendars, notes, tasks, and other items.
5: This method is not helpful for corrupted OST files.
2: Convert OST to PST Using The Professional Solution:
If your OST file gets corrupted or if your OST file is not connected with Outlook, you can take the help of a verified solution MailsDaddy OST to PST Converter. It allows users to perfectly recover highly corrupted OST files without any trouble. After the recovery process users can easily convert OST to PST file format.
Furthermore, users can also move OST files into MBOX, RTF, EML, HTML, MSG, Live Exchange Server, and many more. The solution facilitates users to export complete data items with maintaining folder structure, text formatting, and metadata properties.

Download the Free demo pack of this advanced solution that enables users to test the performance of the software before purchase. The free trial pack can convert the first 20 email items per mailbox from OST to PST.
Visit here: https://www.mailsdaddy.com/ost-to-pst-converter/
Final Verdict:
Here, in this article, I tried to explain all the processes to convert OST to PST using PowerShell Scripts and a professional solution. Users can choose any of the methods and implement them according to their comfort. All methods are helpful and successfully export OST to PST file format. For any further assistance, you can contact with MailsDaddy support team.

