A Shared mailbox is a type of user mailbox. It doesn’t have any own username or password. If a group member sends an email to the shared mailbox, it will appear in share a mailbox, not an individual user. It is a great way for a team or a group of people to monitor and send email from a common email address, like [email protected]. These emails address work as your normal email account but are managed by several people in your organization who have permission to access this mailbox.
A Shared Mailbox is easy to create; here I am explaining to you some steps to create a Shared Mailbox, so please follow the all steps correctly and you can create a Shared Mailbox.
Method 1: How to create a Shared Mailbox in Office 365 by using Admin Console
Step 1: First, open your office 365 Admin account.
Step 2: Then go to the Admin Center and click on Exchange
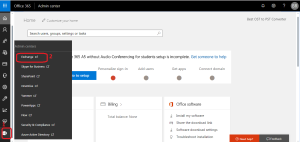
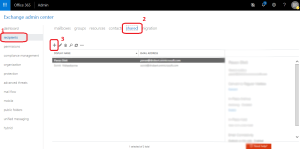
Step 3: Once click on Exchange then you will see a new window will appear on the screen Exchange Admin Center. Now select recipients lowdown dashboard >>Shared>> + icon to create a new Shared Mailbox.
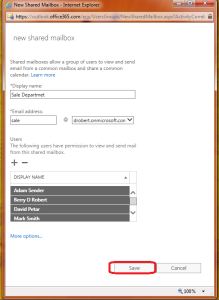
Step 4: When you click on the + icon a window will open on the screen and provide the all required information like Display Name (Mailbox name), Email address and assign the user.

Step 5: Now click on Ok and Save
Method 2: How to set up a Shared Mailbox in Office 365 using PowerShell?
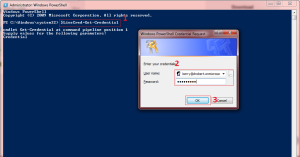
Step 1: First open Windows PowerShell
$LiveCred=Get-Credential
Step 2: Press enter and type your Office 365 Username and Password
Step 3: Now type in the PowerShell Command
$Session=New-PSSession-ConfigurationName Microsoft.Exchange-ConnectionUri https://ps.outlook.com/powershell/-credential $LiveCred-Authentication Basic –AllowRedirection
Import-PSSession $Session
Step 4: Then create a shared mailbox by using the command
New-Mailbox –Name<Shared Mailbox Name> -Shared
Step 5: Set a lower quota
Set-Mailbox <Shared Mailbox> -ProhibitSendReceiveQuota 5GB-ProhibitSendQuota 4.75GB –IssueWarningQuota 4.5GB
Step 6: Give the permissions to the user or group of users for the Shared Mailbox.
Full Access permissions for Shared Mailbox
Add-MailboxPermission <Shared Mailbox> -User <Mail Recipient> -AccessRights FullAccess –InheritanceType all
SendAs permissions for Shared Mailbox
Add-RecipientPermission <Shared Mailbox> -Trustee <Mail Recipient> -AccessRights SendAs-confirm:$False
Step 7: At the end needs to exit on the session before closing Windows PowerShell because you will be the login for next 15 minutes even after closing the window.
Remove-PSSession $Session
Note: A Shared Mailbox doesn’t require a license, but a Shared Mailbox can’t grow larger than 5GB. So if you want to be in free license then needs to set Quota for each shared mailbox by using the PowerShell command described above.
Conclusion:
In this post, I have described the way How to create a Shared Mailbox in Office 365 step by step and I also discussed about two methods, use any method which is comfortable for you. After that, if you have still any doubts just leave a message on the comment box. I will be happy to answer you J