Here in this article, I will discuss that how to grant application impersonation rights in office 365 mailboxes using Office 365 Exchange Admin Portal as well as PowerShell commands.
Working with Application Impersonation in Exchange Online is very helpful for the administrators. As Application Impersonation is the best feature of Office 365 which enables applications to impersonate users to do any activities on their behalf without having their login credentials. This option can be used in many seniors such as PSTs migration to Office 365, Integration with a telephone system, CRM integration, performing scheduled local backups of Office 365 mailboxes, Offboarding and migrating users from one platform to etc.
1) How to Configure Impersonation in Office 365 using Exchange Admin Portal?
Application Impersonation feature is available on Microsoft Exchange Server 2007 or higher and Microsoft Office 365 plan E3. In order to setup Application Impersonation using Office 365 Exchange Admin Portal, the following steps should be carried out.
- Login to the Office 365 Exchange Admin Portal (Skip 2nd step you login with this link.)
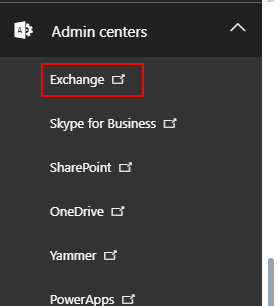
- Go to Admin center and select Exchange.
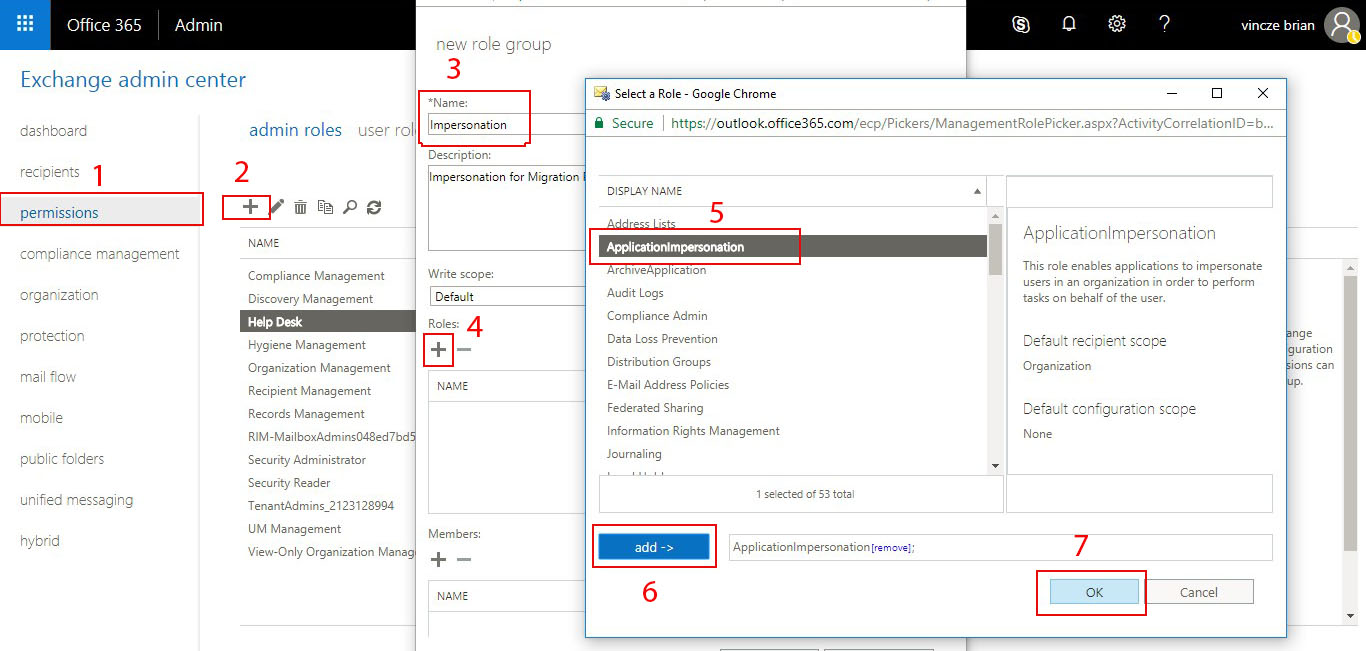
- Now go to permissions > Click on “+” icon to create a new role group > Provide name & description of the role group > Select ApplicationImpersonation by clicking on “+” icon from the Roles > Click on Add button then Press Ok button.
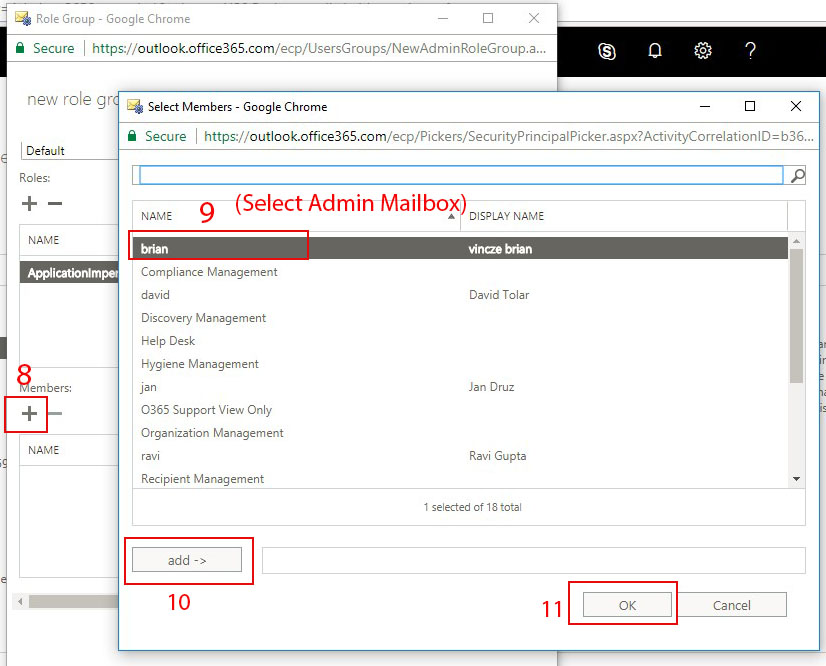
- Now Click on “+” icon from Members and select admin mailbox > Click on Add then Press Ok.
- After setting up roles and members click on save button.

Above steps will ensure you how to grant application impersonation rights in office 365. But if you are planning to perform migration and backup of all users’ mailboxes at once with impersonation using MailsDaddy products then you have to give a few more permissions as shown below.
Provide Full Access Permission to Admin Mailbox
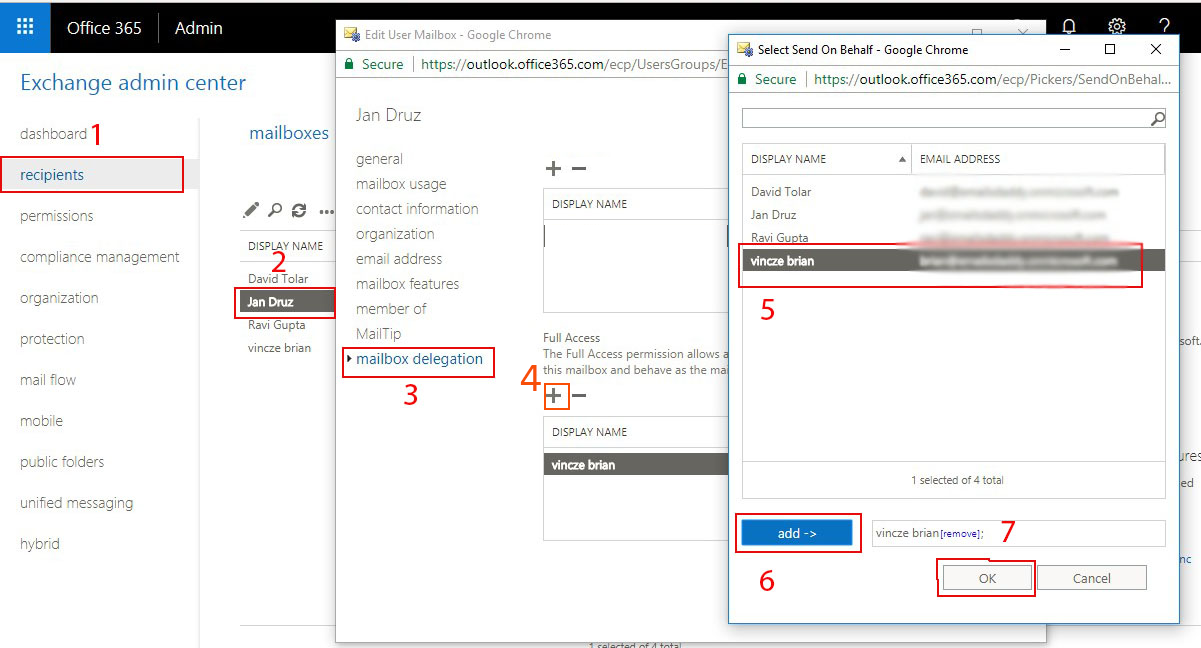
Go to recipients from Exchange Admin center > Double click on each mailbox > Click on Mailbox Delegation > Give Full Access permissions to the Admin mailbox > Finally, click on Save button. That’s it.
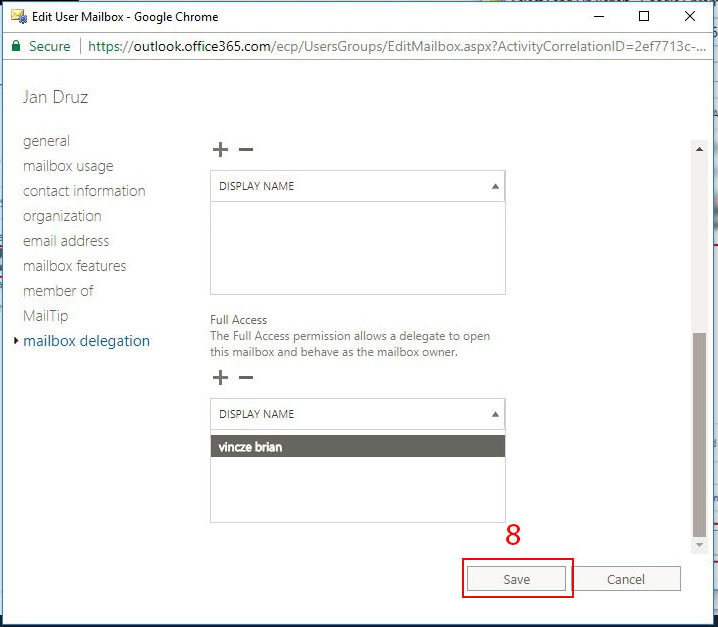
Note: In the above screenshots, I have given permission for one mailbox so in this way you can give the full access permission to each mailbox do you want to backup of migrate using Impersonate Export.
2) Setting up the application impersonation role in Office 365 (Exchange Online) using Windows PowerShell
Pre-requirements:
- Administrative credentials for the Exchange server.
- Domain Administrator credentials, or other credentials with the permission to create and assign roles and scopes.
- Exchange management tools. These are installed on the computer from which you will run the commands.
How to configure impersonation for all users in an organization?
If you are familiar with the Windows PowerShell commands and you want to know how to grant application impersonation rights in office 365 using PowerShell? below steps will show how you can easily give impersonation rights to all office 365 users of your organization with the following commands:
- In the very first step, Open the Exchange Management Shell > Choose All Programs from the Start menu > Microsoft Exchange Server 2013.
- Run the New-ManagementRoleAssignment cmdlet to configure the impersonation permission to the required user. The following example will show you how to grant Application impersonation to enable a service account to impersonate all other users in an organization.
New-ManagementRoleAssignment –name:impersonationAssignmentName –Role:ApplicationImpersonation –User:serviceAccount
How to set up impersonation for specific users or groups of users?
To assign the application impersonation role for the specific users or groups of users, you have to run the following commands.
- 1) As same as above.
- 2) Run the New-ManagementScope cmdlet to create a scope to which the impersonation role can be assigned. You can skip this step if an existing scope is available. The following example shows how to create a management scope for a specific group.
New-ManagementScope –Name:scopeName –RecipientRestrictionFilter:recipientFilter
- 3) Run the New-ManagementRoleAssignment cmdlet to configure the permission to impersonate the users of the specified scope.
New-ManagementRoleAssignment –Name:impersonationAssignmentName –Role:ApplicationImpersonation –User:serviceAccount –CustomRecipientWriteScope:scopeName
Conclusion: In this article, I have discussed how to grant application impersonation rights in office 365 using Exchange Admin Portal and Windows PowerShell commands. I hope this article will help many Office 365 administrators in configuring impersonation in Exchange Online. If you have any difficulty or doubts while assigning application impersonation management role in office 365 then feel free to contact us. We will be happy to help you 🙂