Here, I am going to talk about IMAP Migration from Exchange to Office 365 using different methods. Below you can understand the entire steps involved in the migration tasks.
What is IMAP Migration to Office 365?
IMAP migration is a process to move Exchange mailboxes into Office 365 Cloud accounts. Using this method, you would be able to migrate only Exchange emails to Office 365 as you all know that IMAP is an email protocol called Internal Access Message Protocol. Therefore, here also this process does not allows moving contacts, notes, tasks, etc. from Exchange to Office 365. Through this process, one can migrate a maximum of 500000 items of a mailbox.
How to do IMAP Migration from Exchange to Office 365?
Method 1: Exchange IMAP Migration to Office 365 using Exchange Admin Centre
Step 1: Prepare for IMAP migration
Domain verification: Adding a domain for IMAP migration to Office 365 is very important, as it is the very first step of any Exchange to Office 365 migration that the domain needs to verify to check its ownership in order to have a secure migration from Exchange to O365.
Create users to Office 365: Create users in Exchange Online account and assign them the required permission.
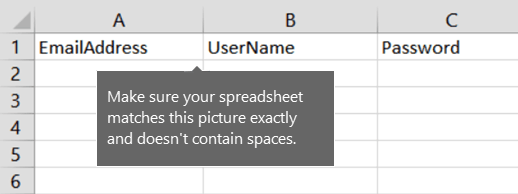
Step 2: Create IMAP migration CSV for 365
Prepare the CSV file for batch migration where you need to create CSV in a specific format containing Email Address, Username, and Password. You need to enter these details for each mailbox that you want to transfer. Now, save the CSV file.
Step 3: Create IMAP migration endpoints.
Now, create endpoints for IMAP migration providing the IMAP Server details. Here, you need to choose IMAP to provide the information of your IMAP Server. The detailed will be verified and the once authenticated to need you to enter the general information.
Learn more about migration endpoints here: https://www.mailsdaddy.com/blogs/create-migration-endpoints-office-365-exchange-online/
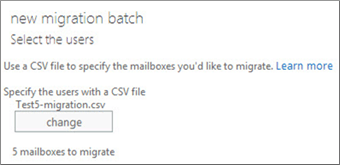
Step 4: Create IMAP migration batch Office 365
In the migration page, choose Migrate to Exchange Online option and select IMAP migration–> next. Browse the CSV and click next and again hit on the next button. Now select the mailbox you created, type the name of the batch and again click Next.
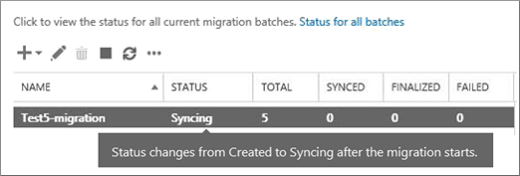
Step 5: Start the IMAP migration batch.
Choose Automatically start the batch–> New. The process will start syncing, you need to wait till it completely synced. You can verify for the same on the migrations page.
Step 6: Route your Exchange Email to Office 365
It means you need to change the DNS to route your Exchange mailbox email to Office 365. This will also help you stop receiving emails to the ON-Premise platform. For this, you need to change the MX record in order to add a new domain to Office 365.
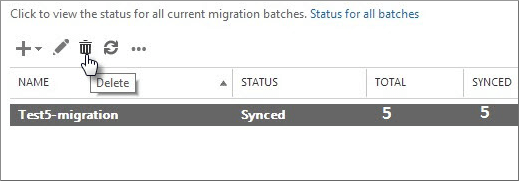
Step 7: Delete IMAP migration batches.
In the Recipients–> Migration page, select the created batch and choose the delete option to remove the batch.
Method 2: IMAP Mailbox Migration to Office 365 using Windows PowerShell
First, follow the same process of preparing an IMAP Migration and creating the CSV as given above. Also, create the migration endpoints.
Create and start an IMAP migration batch.
New-MigrationBatch -Name IMAPBatch1 -SourceEndpoint IMAPEndpoint -CSVData ([System.IO.File]::ReadAllBytes("C:\Users\Administrator\Desktop\IMAPmigration_1.csv")) –AutoStart
To verify,
Get-MigrationBatch -Identity IMAPBatch1 | Format-List
Or, Get-MigrationBatch -Identity IMAPBatch1 | Format-List Status
Then route your email to Office 365 using MX records and delete the IMAP migration.
Conclusion: IMAP Migration from Exchange to Office 365 allows your On-Premise IMAP data to the cloud mailbox of Exchange Online. I hope this blog provides you better guidance in Exchange IMAP Migration to Office 365.