In today’s world, I usually get a lot of queries on how one can import 2003 or the 2007 Exchange Server mailboxes in Office 365 Platform. Here, I am going to discuss each step that helps you to Migrate Exchange to Office 365 using Staged Migration. However, before starting with the technique I will tell about the Staged Migration.
What is Staged Migration?
Staged Migration is a type of migration useful for Exchange to Office 365. There is no limit of migration mailbox, but at a time, you can convert up to 2000 mailbox or user through a single CSV. For moving more mailboxes more than this, it is required to create an additional CSV. This migration process mainly used by small or medium enterprises.
Crucial requirements prior to Migrate Exchange to Office 365 using Staged Migration?
Here, I am giving you a brief detail of what are the several conditions you need to fulfill before starting the method of Exchange to Office 365 migration.
1) Configure Outlook Anywhere in 2007 or 2003
The first step you need to follow is to enable Outlook Anywhere as it allows you to connect with Exchange remotely. In older versions, you need to configure it manually, but in newer versions like 2016 or 2019, it configures automatically. Learn how to enable Outlook Anywhere Settings in a different version of MS Outlook.
2) Assign required Permissions and deactivate UM
Each account should assign with the necessary permissions especially of the administrator for the migration process. Now, you need to turn-off the Unified Messaging option.
3) Insert & Verify Exchange server domain in Office 365
For starting with the migration process, you need to add the On-premise domain to Office 365 and need to verify whether it is valid or not.
Know how to add a new domain to Exchange Online: Add a domain to Office 365
4) Create Migration Endpoints
This is required to connect Office 365 with Exchange Server with all its valid server credentials that contain FDQN of the server, RPC Proxy server, etc.
Learn how to create Office 365 Migration Endpoints.
How to upload Exchange to Office 365 step-by-step?
Method 1: Exchange to Office 365 Conversion with O365 Interface
Step 1: Create Staged Batch Migration:
Under Recipients, go to the migration option and from there click on the plus sign (+) choosing to Migrate to Exchange Online. Select Staged Migration and hit on the Next button.
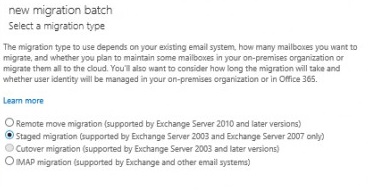
Now, browse the CSV containing the list of On-premise users for migration from Exchange Server 2003/2007 to Office 365. Office 365 validates the CSV file whether all the information provided is correct or not. The CSV file should need to be in a correct format according to Exchange Online standard.
Choose next and confirm the details of the migration endpoints. Again, hit next. Enter batch migration name and Next. Choose new to create a migration batch. After this, the name display on the migration page.
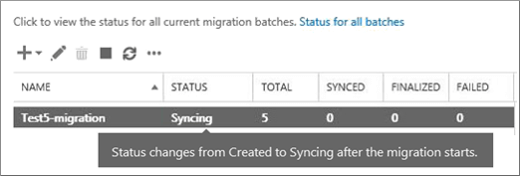
Step 2: Start the batch migration.
Start the batch either automatically or manually from the migration page and wait until the status changed to syncing and then synced.
Step 3: Convert On-premise Exchange mailbox to mail-enabled users.
It is important to move On-Premise mailbox to mail-enabled users as the process of staged migration is incomplete without this. It directs all users’ mailbox to Office 365. With this, you stop receiving emails on your On-Premise Exchange mailbox.
Method 2: Move Exchange to Office 365 PowerShell
Here, also before using the MS Windows PowerShell fulfill all the requirements needed before the start of the process.
Step 1: Create and start the migration batch
To auto start the batch migration executes the command:
New-MigrationBatch -Name StagedBatch1 -SourceEndpoint StagedEndpoint –AutoStart
To start it manually run the below command:
New-MigrationBatch -Name StagedBatch1 -SourceEndpoint StagedEndpoint
To verify it, use:
Get-MigrationBatch -Identity StagedBatch1 | Format-List
Or
Get-MigrationBatch -Identity StagedBatch1 | Format-List Status
Step 2: Remove the synced batch migration.
Follow the process of converting the on-prem mailbox to mail users and delete the batch migration.
To delete it:
Remove-MigrationBatch -Identity StagedBatch1
Now, verify it:
Get-MigrationBatch StagedBatch1
Step 3: Complete the methods with final further tasks
Assign licenses to Office 365 users and complete the process following the post-migration tasks.
Required Tasks after Exchange Server to Office 365 data conversion
1) Route emails to Office 365
After completion of the migration process, it is required to create DNS for the new Exchange mailbox in Office 365 to route all On-premise emails to o365 Cloud environment.
2) Delete staged migration batch
Finally, delete the created and synced batch from the migration page of the Admin Centre portal to complete the final procedure of the method.
3) Create and Manage DNS and Decommission the Exchange
After the migration of the On-premise Exchange to Office 365, create an Autodiscover DNS. Once the process is completed, you can decommission or remove the Exchange.
Conclusion: Here, I tried to explain how to Migrate Exchange to Office 365 using Staged Migration. Hope this blog helps you implement the process from Exchange to Exchange Online.