Here, you know all about the Cutover Migration and the entire steps involved to perform Cutover Migration. Follow the below blog to know the complete details of this migration process.
What is cutover migration in Exchange to Office 365 Migration?
A cutover migration is one of the methods to import Exchange to o365 that allows moving up to 2000 mailboxes from On-premise to the cloud area of Office 365 environment. This process is applicable for Exchange 2003 and all the other later versions. It is the process to move mailboxes from Exchange to the cloud-based platform.
The entire process divided into the 3 categories and each needs to fulfill for a successful Exchange Server migration to Office 365.
- Pre-migration tasks
- Batch creating and deletion
- Post-migration tasks
The process starts with the verification of the On-premise Exchange domain with connecting of the Exchange server to o365, creating of the migration batch to the deletion of the cutover batch.
Pre-requisites to perform Cutover Migration for Exchange to Office 365?
1) Configure Outlook Anywhere
You need to configure Outlook Anywhere (RPC over HTTP) on the On-premise Exchange server. This is required as an email migration service uses Outlook Anywhere to connect to Exchange Server.
Note: Each Exchange version has different steps of configuring the Outlook Anywhere. Exchange 2013 provides the Outlook Anywhere configuration automatically with Exchange Server.
You must also have an SSL certificate for Outlook Anywhere issued by a certificate authority for cutover migration.
2) Set permission to Exchange user accounts.
For any migration process, it is always necessary to provide all the important permission required for a successful migration process. In addition, Admin must have the FullAccess or the ReceiveAs permission to start the process.
3) Disable Unified Messaging
It is required to turn off the Unified Messaging before starting with the process of Exchange server to o365.
4) Verify the On-premise domain.
Before Exchange mailbox migration to Office 365, you need to follow the process of domain verification in order to authenticate the ownership of the Exchange domain of your organization. This step is important as during the migration process the SMTP of each Exchange mailbox used to create an email address for a new Office 365 mailbox. You can complete the verification process either signing to the domain hosting provider or adding a TXT record. Before going with this process, you cannot start the On-premise Exchange to office 365 data conversion.
Learn the steps to verify an external domain to Office 365
5) Connecting On-premise servers to Exchange Online
Now, I am going to tell how one can connect Office 365 to the Exchange On-premise server. Here, you need to create the migration endpoints choosing Outlook anywhere as for cutover migration Outlook is required.
Steps to connect to Exchange server to O365
- In the Exchange Admin portal page, hit on Recipients–> Migration.
- Choose more (…) option–> Migration endpoints–> new+
- Select the migration endpoint type that is Outlook anywhere–> next.
- Now, enter the email address of the Exchange user that you wish to migrate.
- Type the Exchange account with Administrative permission or insert the Admin account ID and Password then clicks the next
- If Office 365 successfully connects to Exchange server the connect setting is displayed. Hit on the Next.
- For the failure of the Office 365 connection to Exchange Server, type the Exchange Server and RPC Proxy Server name.
- Now, enter the migration endpoint name and hit on the new
To know this process in more detail: Create Migration endpoint
How to migrate users from On-premise Exchange to Office 365 Cloud?
Method 1: How to transfer Exchange to Office 365 using Exchange Admin Portal?
Step 1: From the Admin portal, select Migrate to Exchange Online options.
After login to Office 365, go to Exchange Admin Centre. Under recipient of the migration section click on the plus sign (+) choosing, migrate to Exchange Online.
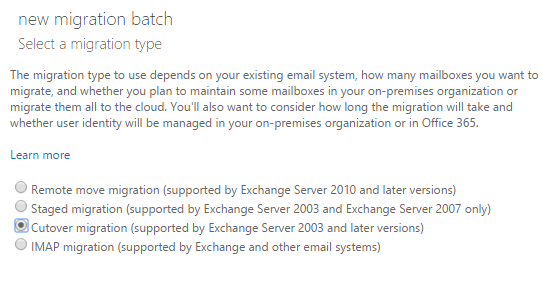
Step 2: Choose Cutover Migration
A dialog box will appear where you find different migration types. Select Cutover Migration and Next.
Based on the migration endpoints the connection setting will be visible showing you the Exchange Server name and the RPC Proxy Server. Check the details and click on the Next. If not visible enter the information manually.
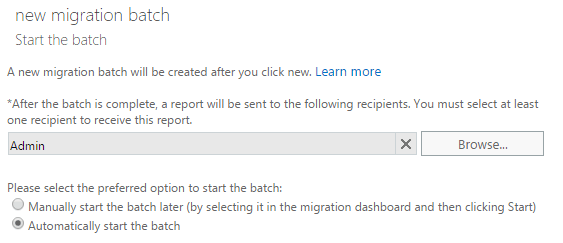
Step 3: Start with the cutover batch migration
Now, type the name of the migration batch–> next and start the batch migration.
For the batch cutover migration, you need to choose anyone from the given option-
- Automatically start the batch
- Manually start the batch later
Click on New button to start the cutover batch process.
Step 4: Change the batch status from created to synced.
Go back to recipients–> Migration. Select the created batch and start the process, as you start it the status changes to syncing and after the completed the status changes to sync.
Step 5: Change DNS to route On-premise email to o365
Routing Exchange email to Office 365 to make sure where the email needs to deliver to the Office 365 mailbox and for this, it allows adding the MX record or the DNS record to route email.
Step 6: Delete the synced batch assigning licenses to Office 365 users.
After the routing process of emails to office 365 delete cutover batch migration. For deleting, go to the recipientsà Migration then select the batch and choose the delete option. Finally, assign licenses to Office 365 users.
Tasks after importing mail from Exchange to Office 365
1) Create AutoDiscover DNS server
Once the entire Exchange mailbox migrated to MS Office 365 accounts, create an AutoDiscover DNS record to access the On-Premise mailbox easily. Here, you need to create the AutoDiscover DNS with the same namespace as in Office 365.
Under CNAME, Alias: autodiscover and Target: autodiscover.outlook.com
2) Decommission Exchange after Migration to Office 365
After the complete migration of Exchange mailbox to Office 365 accounts, you can completely uninstall or remove Microsoft Exchange.
Method 2: How to do Exchange Migration to Office 365 using PowerShell?
Before using the Windows PowerShell here also first, you need to prepare for the cutover migration verifying the Exchange domain to Office 365 and enable Outlook anywhere creating migration endpoints to connect to the Exchange servers. Assign all required permissions to Exchange user account and fulfill all the pre-requisites to migrate to Office 365.
1) Verify the connectivity of an Outlook anywhere
Before verifying, you need to connect PowerShell to the cloud platform of the Exchange Online.
$Credentials = Get-Credential
To test the connection of the cloud environment to On-premise user accounts:
Test-MigrationServerAvailability -ExchangeOutlookAnywhere -Autodiscover -EmailAddress <email address for on-premises administrator> -Credentials $credentials
2) Create migration endpoints using the below commands.
New-MigrationEndpoint -ExchangeOutlookAnywhere -Name CutoverEndpoint -ConnectionSettings $TSMA.ConnectionSettings
3) Verify created cutover endpoints.
Get-MigrationEndpoint CutoverEndpoint | Format-List EndpointType,ExchangeServer,UseAutoDiscover,Max*
4) Create cutover migration batch executing the given commands.
New-MigrationBatch -Name CutoverBatch -SourceEndpoint CutoverEndpoint –AutoStart
Here, AutoStart will let the batch migration start automatically.
To verify the automatic cutover batch run the command:
Get-MigrationBatch | Format-List
You can also start the cutover bath manually:
Start-MigrationBatch -Identity CutoverBatch
To verify it: Get-MigrationBatch -Identity CutoverBatch | Format-List Status
5) Route the email to Office 365 using the MX or the TXT record.
6) Delete cutover batch migration.
Remove-MigrationBatch -Identity CutoverBatch
7) Assign licenses to the user account and Follow the post-migration steps.
Conclusion: With this blog, you understood how to perform Cutover Migration for Exchange to Office 365 implementing its various steps involved the entire data conversion.