Using Zoho’s native migration solution makes migrating from Google Workspace to Zoho workplace easy and convenient. It allows you to securely transfer emails, contacts, and other metadata without the need for any third-party applications.
This article provides a comprehensive guide on how to migrate from Google Workspace to Zoho Workplace.
Why migrate to Zoho Workplace?
Companies often choose Zoho Workplace over Google Workspace—whether due to cost savings, the centralized availability of apps through Zoho’s product suite, or Zoho Mail’s robust privacy policy and ad-free environment. Zoho Workplace offers an excellent free plan, affordable paid versions, and full compatibility with Zoho CRM and Projects.
What gets Migrated?
| Data type | What things can be migrated | Additional info |
| Emails | All Gmail messages, all Gmail folders, all labels, starred messages and important messages, and attached files. | Zoho Mail converts labels into folders and creates tags for starred/important messages (ZMStarred, ZMImportant). |
| Contacts | All Google Contacts, along with contact categories and groups. | Zoho Contacts migrates all contacts based on their categories. |
| Calendar | All Google Calendar events, recurring events, and shared calendars | For the migration to be successful, the domain names must match. |
Prerequisites – Before Starting Migration
1. Create a Google Service Account
It is the key used by Zoho’s migration utility to get secure access to your Google workspace data without using individual users’ passwords.
Required steps:
- Sign up into your google account at console.cloud.google.com using super admin credentials.
- Click the project dropdown menu at the top and choose New Project. Specify the project name, e.g. “Zoho Migration”, select the organization and press Create button.
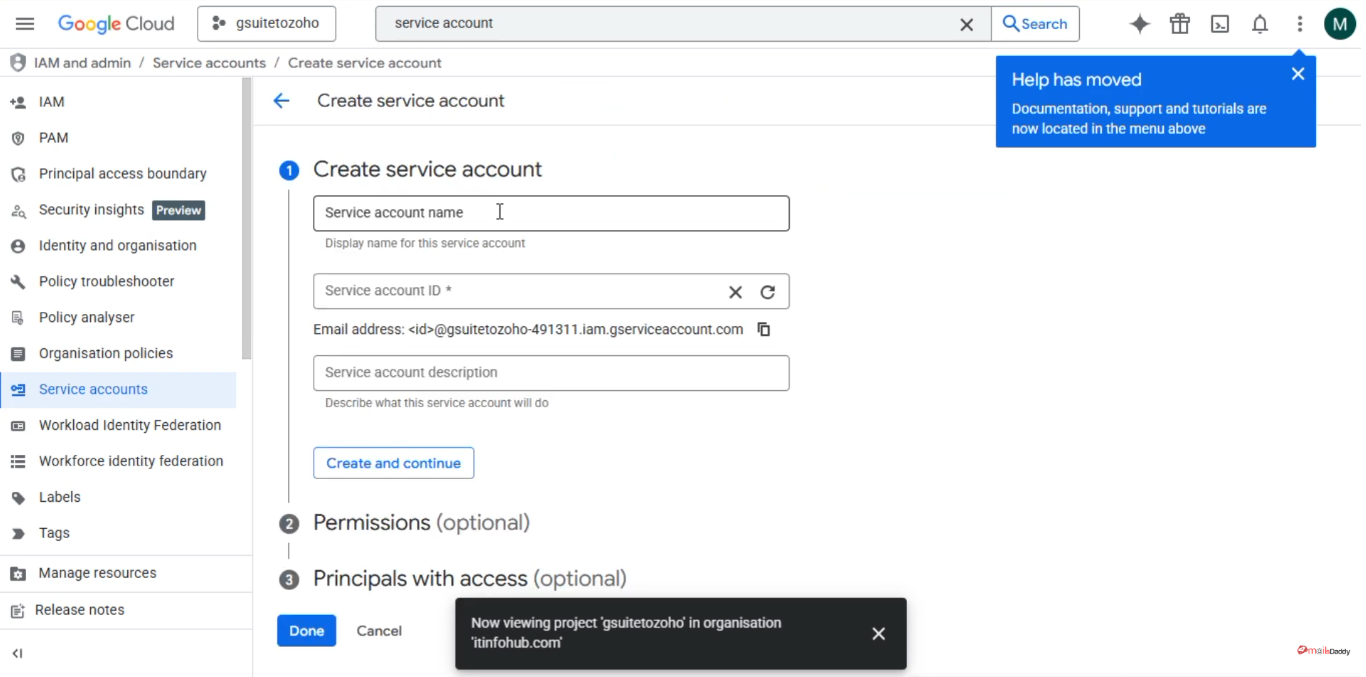
- Click IAM & Admin >> Service Accounts or use search to locate a Service Accounts tab and click Create Service Account button.
- Fill in a name and a description field and click Create and continue.
- On the role assignment page specify Project >> Owner and click Continue, then Done.
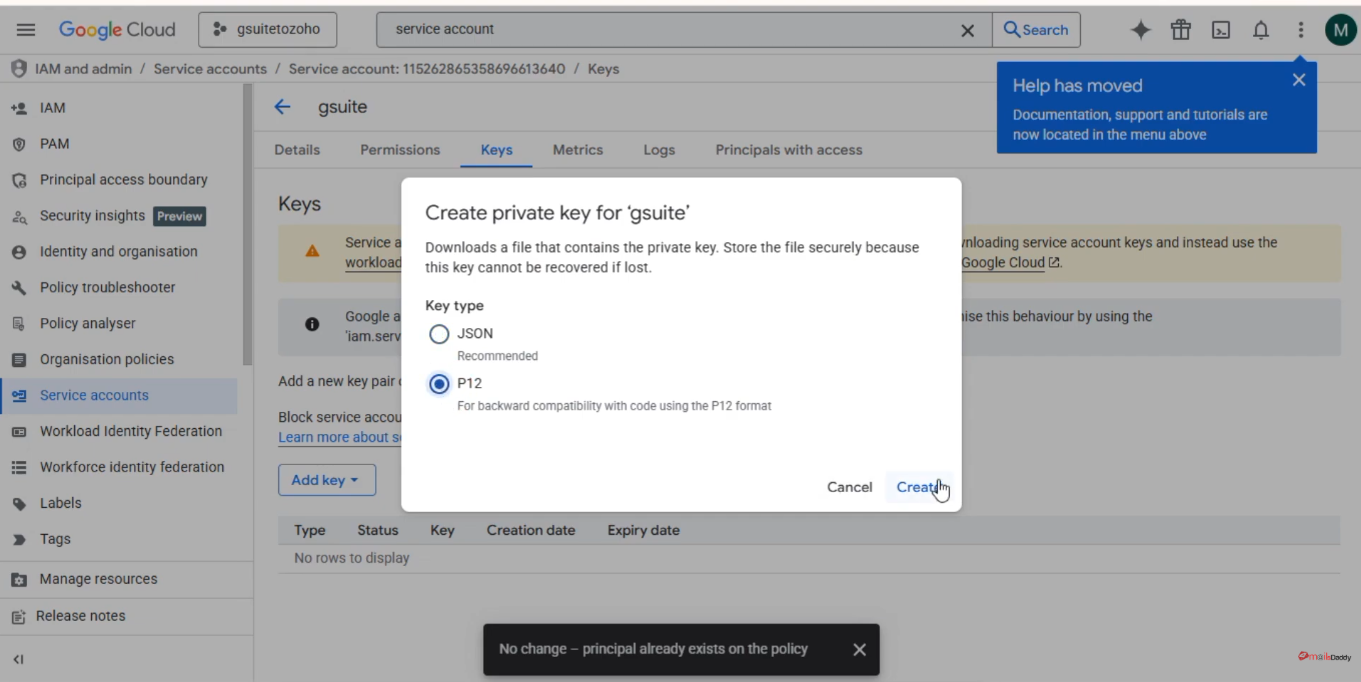
- Press the service account email in order to open its properties and copy or note the Client ID(Unique ID), Service Account Email both will be needed later.
- Click Keys tab, press Add Key >> Create New Key, set P12 file type and press Create button. The .p12 file will automatically download into your PC’s default location.
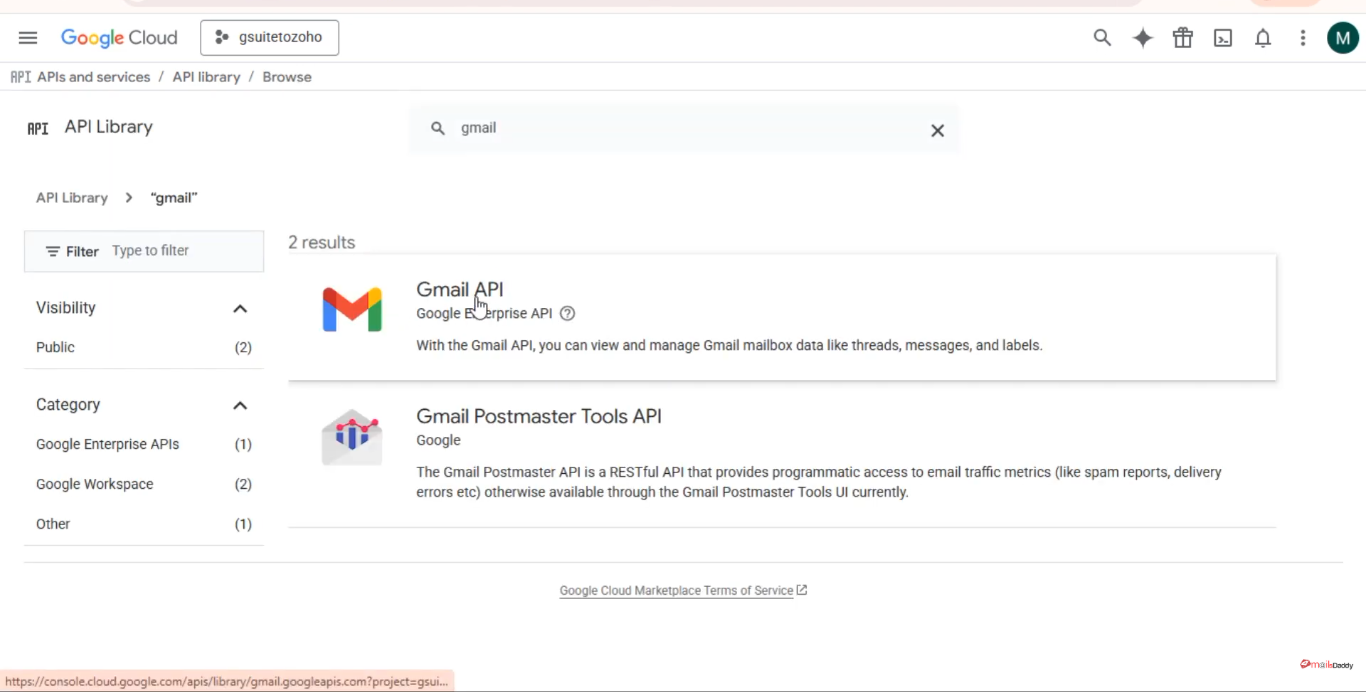
2. Enable API access
- Go to Search Bar and search APIs and services.
- Click on the library and enable necessary APIs.
- Individuals search and access these APIs such as Gmail API, Google Calendar API, Google People API, and Admin SDK API.
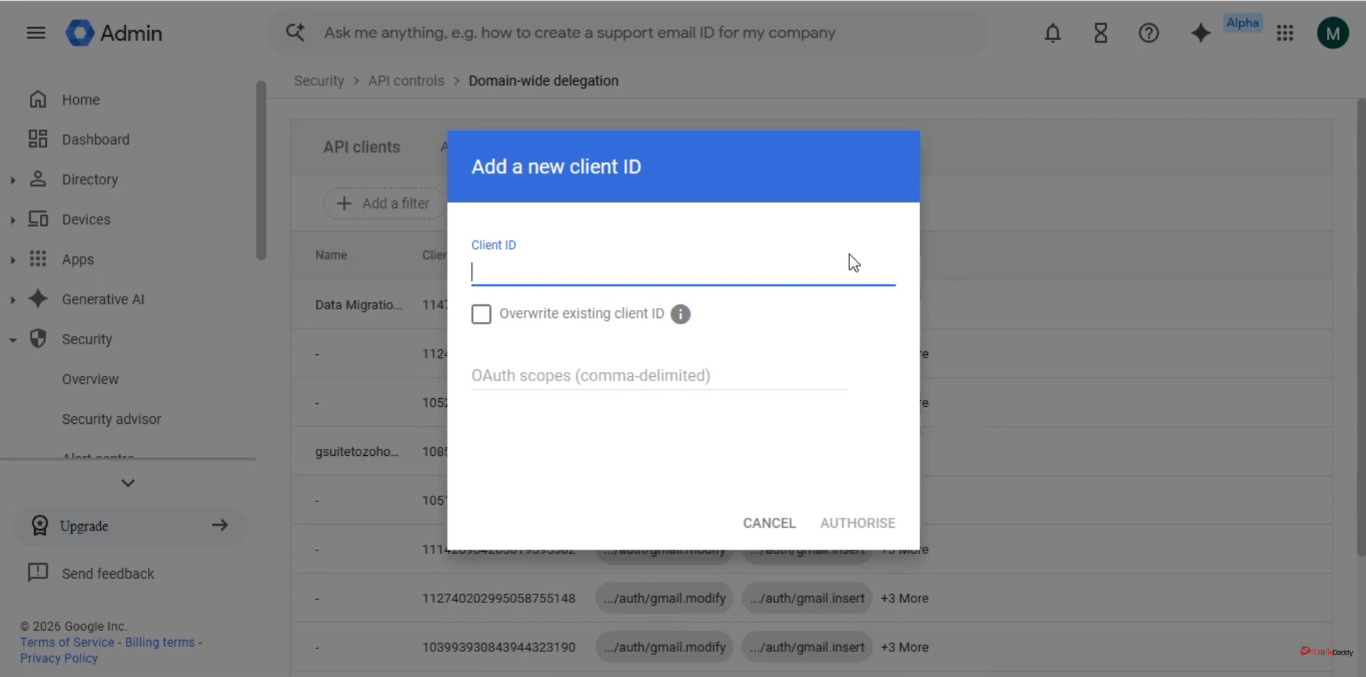
3. Set Up Domain-Wide Delegation of Google Workspace
- Go to Google Workspace Admin Console and login.
- Click on Security → Access & Data Control → API Controls.
- Scroll down and select Manage Domain-Wide Delegation.
- Now click on Add New and then add your Client ID here.
- Add the following OAuth scopes in the OAuth scopes section:
https://www.google.com/m8/feeds/contacts/default/full,
https://www.google.com/m8/feeds,
https://www.googleapis.com/auth/gmail.readonly,
https://www.google.com/m8/feeds/groups/default/full, https://www.googleapis.com/auth/admin.directory.user.readonly, https://www.googleapis.com/auth/admin.directory.domain.readonly, https://www.googleapis.com/auth/admin.directory.group.member.readonly, https://www.googleapis.com/auth/admin.directory.group.readonly,
https://www.googleapis.com/auth/calendar,
https://www.googleapis.com/auth/admin.directory.resource.calendar
- Click on Authorize.
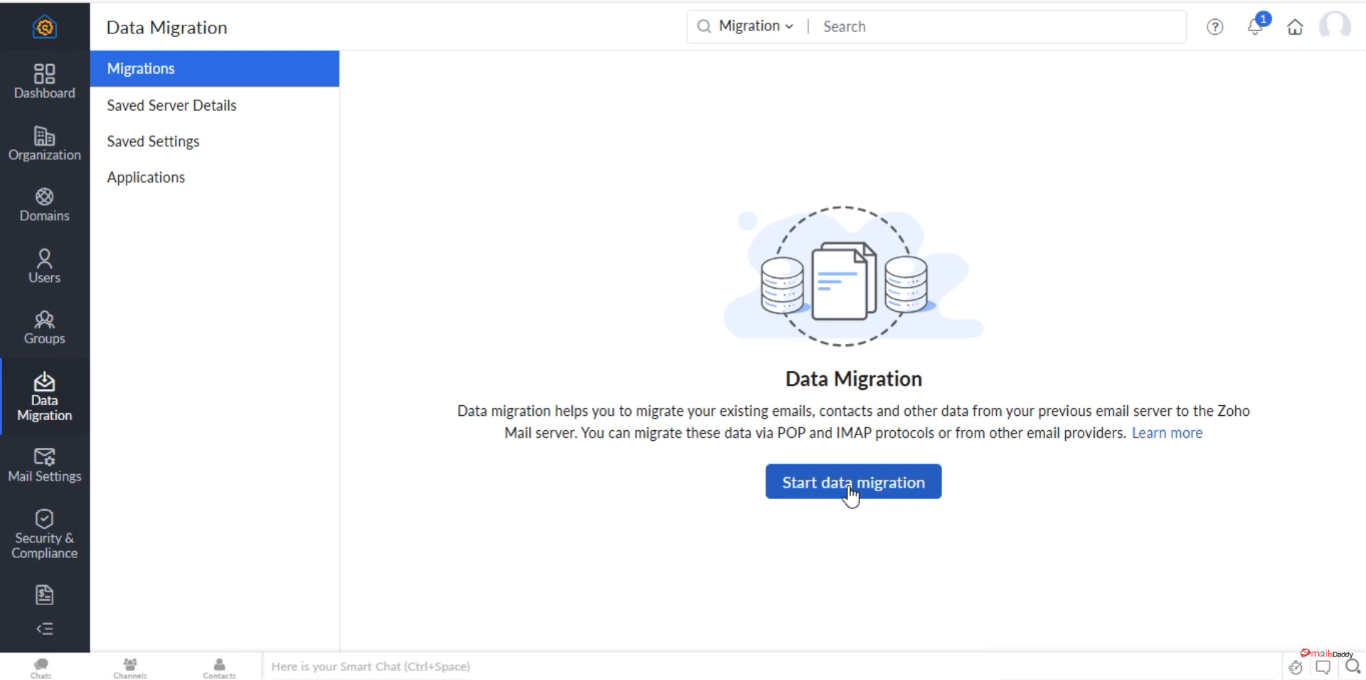
4. Email, Contacts, and Calendar Migration (Zoho Mail)
One of the features offered by Zoho Mail is a Data Migration tool that can migrate emails, contacts, and calendar from Google Workspace in a matter of minutes, using a one-click approach (app-based). This method is recommended for organizations.
- Login to the Zoho Mail Admin Console (mail.zoho.com/cpanel) -> Data Migration tab -> click on Start Migration.
- Provide the migration Name and in the field Select Protocol/Application, select the option Google Workspace.
- Provide your Super Admin Google Workspace email and also email of the Service Account you created earlier.
- Click on Upload Secret Key File and upload the .p12 key-file you’ve obtained from Google Cloud Console.
- Click the Authenticate button.
- Now select the data which you want to migrate and click on the Add button.
- Now, leave things as it is and click Create.
- Go to the User tab and +Add users by manually or import from CSV file.
- Now review the details, click on the Start Migration.
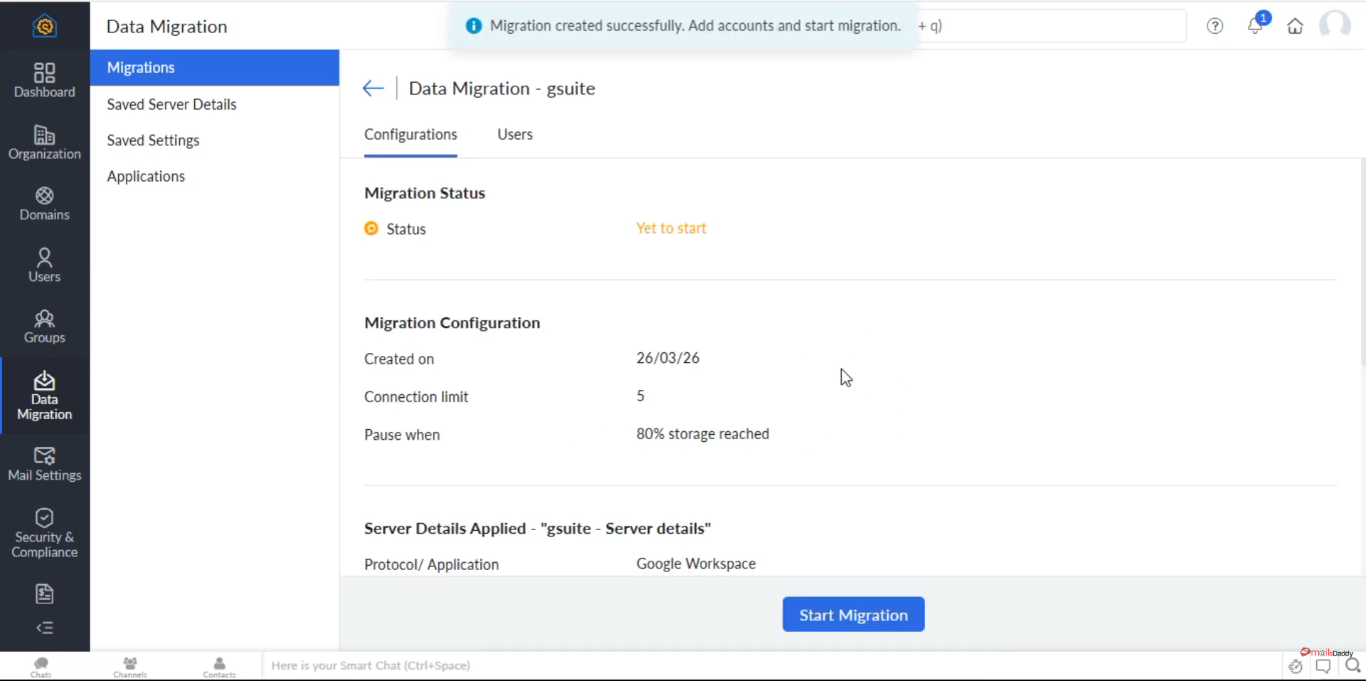
- Once the migration process starts then it shows the status.
- When migration completes, it will show you Completed status.

Tip: This migration is somewhat technical; therefore, it is advisable to perform a trial migration with just 3 to 5 users. Once you have ensured that everything is working correctly, only then should you proceed with the remaining users.
Conclusion
To successfully complete the migration, it is essential to have everything prepared in advance. This includes verifying the domain, properly setting up the Google Service Account, and creating accounts beforehand.
The process of migrating from Google Workspace to Zoho Workplace has been extensively documented and is quite manageable through the inbuilt migration utility of Zoho. By using this utility, the migration of emails, contacts, and calendars can be accomplished quickly.
You can also book cloud migration services with MailsDaddy Support. Our experts are fully capable and efficient at handling migrations of any size on your company’s behalf.